This tutorial focuses on building networks with higher-dimensional representations. Unlike the simple communication channel or neural integrator, many parts of cortex are best characterized as using vector (as opposed to scalar) representations.
Perhaps the best known example of vector representation in neuroscience is found in the work of Georgopoulos and colleagues in motor cortex. In this tutorial we build and explore representations like that found in motor cortex.
In these experiments, Georgopoulos et al. found that neurons in primary motor cortex had preferred directions of arm movement. In the 2D planar movements that were being executed, the movement direction that caused the highest activation of different neurons (i.e. the preferred direction) were distributed about evenly around the starting point of the arm. Here we construct a population of neurons with this kind of response.
-
Create a network
-
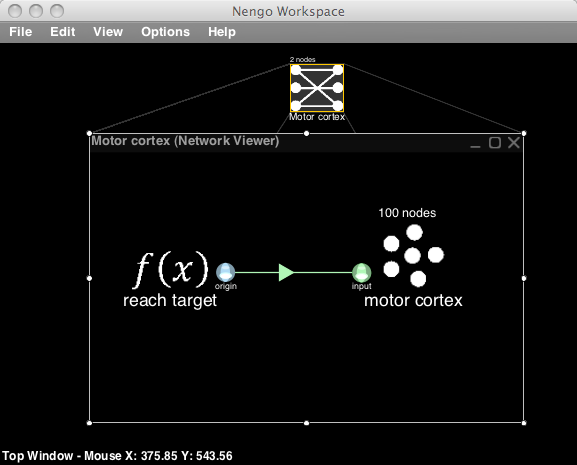
Right-click on the background of the top-level Nengo world and select New network. Call it
motor cortex. -
Create some cortical neurons
-
Right-click in the Network Viewer and select Create new->NEFEnsemble.
- Set the name to
motor cortex, the number of nodes (neurons) to100, and the number of dimensions to2. - The default method for generating preferred direction vectors in Nengo is to choose them from an even distribution around the unit circle (as in motor cortex). (To change this, you can click the Advanced button, but for now the default is appropriate).
-
Click Ok.
-
Create terminations on the neurons
-
To accept input, terminations need to be created on the population. Right-click the motor cortex population and select Add decoded termination. Set its name to
inputand tauPSC to0.01, indicating a 10ms time constant for the post-synaptic current (AMPA receptors). - When adding a termination, the input dimension can be adjusted. This defines the shape of the transformation matrix for the termination, allowing for projections that change the dimension of the data. In this example, one 2-dimensional value will be provided (i.e. the reach target location).
-
Set the dimensions to
2and click Set Weights. Input the 2-D identity matrix[1 0; 0 1]. This simply takes the 2D input and maps it into each of the dimensions represented by the neurons. -
Create an input to drive the neurons
-
Right-click in the Network Viewer and select Create new->Function input.
- Set the name to be
target, the output dimensions to be2, and press Set Functions. - For both dimensions, choose Constant Function and click Set. Set the values for each to be
0.5. This defines the horizontal and vertical position of target vector being represented by motor cortex.
-
Connect the network
-
Drag the origin from the target function to the input termination on the motor cortex neurons.
-
Collect data from the network
-
To display the performance of this network, the Interactive plots system is used. See the interactive plots reference sheet for a summary of this feature.
- Right-click in the Network Viewer and select Interactive plots.
- This shows the network again, but now right-clicking on the elements lets you choose the kinds of plots and controls to display.
- Press play (bottom right) to start the simulation. Some graphs may be already open as the Interactive plots can save the most recent layout.
- Right-click the motor cortex and select preferred directions to show the neuron activity plotted along their preferred directions in the 2D space. Also select the XY plot from the right-click menu to see the value decoded from this neural activity.
- Right-click the target and select controls to display slider controls that allow you to control the input. Move these sliders and see the effect on the preferred direction plot.
- Right-click the target and select XY plot to show a 2D plot of the current control values.
- Right-click the target and select value to show the inputs to the network over time.
- Right-click the motor cortex population and select firing rate to see the overall activity of these neurons. While they are initially randomly ordered, right-click on the firing rate grid and select improve layout to organize the neurons so that ones with similar preferred direction vectors will be near each other, as in motor cortex. Move the sliders and observe the change in firing pattern.
- This summarizes approximately how motor cortex was thought to encode a movement to a target by Georgopolous et al. (There are some important differences, please ask if you are interested).